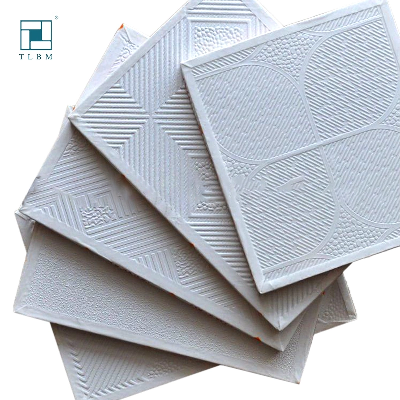
Products Description Product: drywall embossed pvc film gypsum
board false ceiling Material: Pure gypsum powder;Quality wood-pulp
paper;Fiber glass;Adhesive,etc Type: Standard/Waterproof/Fire
resistant Width: 1200mm 1220mm 595/603mm*595/603mm Length: 1800mm
2400mm 2440mm 2700mm 3000mm 3600mm Thickness: 7mm 7.5mm 8mm 9mm
9.5mm 10mm 12mm 12.5mm 13mm Edge: Tapered or Square Usage: Wall
Partition and Suspended Ceiling in home decoration
FeaturesA.Type:1. Regular Gypsum Board2. Fire proof Gypsum Board3.
Water-resistance Gypsum BoardB.Color of the surface protection
paper:white-usually for standard gypsum boardred-usually for
fire-resistant gypsum boardgreen-usually for moisture proof gypsum
boardC.Features:1) Non-absorbent, fire retardant and
self-extinguishing2) Weather proof, vandal proof, can be shaped,
molded, painted and screen printed3) Non-corrosive, non-toxic and
chemical resistant4) Tough, rigid with high impact strength5)
Non-warping and stain ;proofD.Performance1 Aging proofing2. Frost
resistance3 Light weight4 Environment friendlyE.ApplicationHotel,
Restaurant, Office, Station, Shopping Hall and private home of
Ceiling, Partition and Dry lining wal Feature:1) Surface:
Imported or domestic PVC Film. / Painting 2) Back:
Aluminium foil /Non-woven fabric3)Edge: square and Fell
level4).Environment protection product: Adopting natural gypsum
material free of any harmful material.5).Non-flammable B1, in
accordance with Chinese standard GB8624-19976).Not deforming, not
cracking: keeping integrity and sound insulation for long under
normal changes of.7).Light weight, convenient to
transport.,Corrosion-resistant, Non-dust, Easy clean Step
1: Construct a pair of T-braces from 2 X 4s about an inch longer
than the distance from floor to ceiling. Nail 2 X 4s about 3 feet
long to one end of each longer 2 X 4 to form the Ts. Alternately,
adjustable T-braces can be rented. Step 2: Cut drywall panels
to size. Use a sharp utility knife along a straightedge to cut
drywall. After you make the cut through the face paper, place the
board over a length of 2 X 4 laid flat on the floor, or some other
type of support, and snap the scored section down. The gypsum core
will break along the line you cut. Then turn the panel over, cut
the paper on the other side, and smooth the rough edges with very
coarse sandpaper on a sanding block. Step 3: Install drywall
panels on the ceiling. If possible, try to span the entire width
with a single sheet of wallboard to reduce the number of joints.
Position and wedge the T-braces against the drywall sheet to hold
it in place until you finish nailing it. Step 4: Drive nails
at 6-inch intervals into all the joists covered by the sheet. Start
in the center of the drywall panel and work out. Give each nail an
extra hammer blow to dimple the surface slightly without breaking
the face paper. Step 5: When the ceiling is finished, cut and
install wall panels. Carefully measure for any cutouts in the
drywall, including electrical outlets, switches, or light fixtures.
To make cutouts, draw a pattern of the cutout on the wallboard,
drill a hole on the pattern line, and then use a keyhole saw to
follow the pattern. Step 6: Space the nails 6 inches apart
along studs, but start nailing 4 inches from the ceiling. Butt the
wall panels against the ceiling sheets. Dimple all nails. Nail
metal outside cornerbeads to cover any outside corners.Popular
Color designWe have more than 100 designs, including white and
colorful, if you want to know other designs, feel free to contact
us any time!/* January 22, 2024 19:08:37 */!function(){function
s(e,r){var
a,o={};try{e&&e.split(",").forEach(function(e,t){e&&(a=e.match(/(.*?):(.*)$/))&&1
Related products about MID-East Market Popluar Ceiling Gypsum Board PVC Lamination Plaster Board
-
 Waste Tyre Plastic Recycling Machinery Machine Tire Crusher Production Line Rubber Crumb Grinding Machine Equipment Tire Shredder
-
 Stretch Plastic Blowing Pet Bottle Making Blow Molding Machine Bottles Stretch Automatic Pet Bottle Blowing Machine
-
 Waste Plastic Pet Bottle, Water Bottle Flake, PP/HDPE/LDPE PE Film Jumbo Woven Bags Plastic Crusher Machine, Plastic Crushing Washing Recycling Machine
-
 Type 2 Wall-Mounted Electric Car Charging Station 7kw /11 Kwelectric Vehicle Charging Station Home Wallbox AC EV Charger Single Phase or 3three Phase
-
 G-View G12W Wholesale Auto Car LED Headlight Bulb High Power H13 H11 9005 H7 H4 Car LED Headlights LED Car Lights
-
 New Design Porcelain Round Plates Dinner Set for Wedding and Banquet
-
 China 2023 New Design Super Soft 100% Polyester Microfiber Knitted Oversized Decoration Hoodie Blanket
-
 Handmade Art Creative Materials Thickened White Paper Cup DIY Disposable Handmade Colored Paper Cup


